Tuesday 23 April 2013

Reverse Reverb Effect


Here’s a quick trick on how to produce reverse reverb on a track.


  1. Take a recorded track, whether it be guitar/piano/vocals/drums, now duplicate that track so it is  identical to the first one. 
  2. On the newly created track, add a reverb plugin and make the settings 100% wet with as much reverb as possible (as long as it sounds decent).
  3. Now you’ll need to reverse the track. In Cockos Reaper, you can right click on the track and select “Reverse track to new take”. 
  4. Right click on the track and select "Apply Effects to new Track"
  5. Reverse the track again so the peaks line up with the original track. And keep the same reverb effect active on the track so the hits between the 1st and 2nd track blend in together.
  6. Now you can cut sections of the track so the reversed reverb builds up when the original track hits. Meaning, for vocals, cut the 2nd track at the point where the first tracks vocals start. You can do this at several sections in the track as you see fit.


This effect sounds awesome on big hits, pianos, vocals. Try it out and let me know how it works for you. 

Questions/comments, don’t hesitate to ask.

Monday 15 April 2013

Targeted Results


Matched Content Keywords

Like many of you, one of the things I try to do with my music is to get my name out and get it noticed.
The way this works, for the most part, is through tags (keywords) that users search for on google/bing, youtube, facebook, etc…

One thing I struggled with for a long time was which tags to add to my videos and website to get the most amount of hits possible. Thanks to my partner network Fulscreen.net, I discovered the use of Google Adwords Keyword Tools. THIS THING IS AMAZING!!!


Hopefully the link works for you, if not just search for Adwords Keyword Tool, and you’ll find it.
I typed in the most common search terms/tags that I thought users would type in while looking for my kind of content, and hit search. Not only do the results show you all kinds of variations of the search terms, but they rank them by global monthly searches, and local monthly searches. 

I sorted the results by global rank, and now I have myself a huge list of very popular search terms to tag my online content with. Thus allowing my content to be found higher up in the results and allowing it to show up more often because of the different variations of the search terms I’ve found. 

Give it a shot and benchmark your content to see if you see a significant spike in results.

Best of luck!!

Saturday 30 March 2013

Djent/Metal EQ'ing

Now that I have a little more experience with mixing I figured I could share some of what I've learned.
When mixing your songs you'll find it useful to know where each instruments sits in the mix. I won't lie and pretend I know everything about frequency ranges, so you don't need to need to know it either.
Here's where your instruments sit in a typical djent/metal song:

Frequency Ranges

Guitar
80HZ to 5000HZ (5KHZ)
Bass
40HZ to 5000HZ 5(KHZ)
Drums
40HZ to 20,000HZ (20KHZ)

Now the next major part is knowing where each instrument clashes, this will allow you to cut your EQ in certain spots on each track giving each instrument their own "space".

Clashes

GTR & BASS
80hz OR LESS

GTR & DRUMM
400HZ AND 2000HZ TO 5000HZ

DRUMS & BASS
LOW 60HZ MID 400HZ HIGH 2000 TO 8000HZ

Just so it's clear, you're guitar and bass will clash anywhere from 80HZ or less, your guitar and drums will clash around 400HZ and 2 to 5KHZ, and your drums and bass will clash around 60HZ, 400HZ, and between 2 to 8KHZ.

The biggest and best part of this is knowing all of these things combined, where to cut your EQ's so that you'll hear each instrument properly in the mix. Thus avoiding muddy mixes and giving your tracks clarity and overall better sound. Here are the cuts you should make:

Cuts

GTR 100HZ AND BELOW

GTR DROP 2-3BD AT 2000 TO 5000HZ

DRUMS DROP 2-3DB AT 400HZ

DRUMS DROP 6DB AT 60 TO 80HZ

Same principle as before, this means you should create a high pass filter on your first EQ band in your guitar track and cut anything below 100HZ. As well as drop 2-3 decibels at approximately 2 to 5KHZ. As for drums, drop 2 to 3 decibels at approximately 400HZ, and drop roughly 6 decibels at approximately 60 to 80HZ.

Drops in DB's should be made with a fairly thin bandwidth so as to not lower too much of the rest of the EQ.

Here's a picture of the EQ settings I currently use. Notice the small cuts in DB's.


Of course these are all guidelines, not written in stone. You can also try creating a peak similar to my 4th band, and sweep it across to find a sweet spot where it makes your track sound better. In my mix I found that making a little bump around 5000HZ gives my guitar tracks a little extra shine that they otherwise wouldn't have.

Have fun playing with these things, and most of all be patient. Try new things until you get it to a point that you enjoy.

Happy EQ'ing!

Tuesday 19 March 2013

Reaper FX Tip

After 2+ years of using Reaper as my main DAW, I discovered something while recording my track Jihad Ballad.
The guitar tracks both have the built in Reaper EQ. I was sitting here playing with the automation for each track when I noticed that I could automate the EQ itself. I started playing around with the different bands and found a cool effect to use in the track by automating the 4th band (high frequency).
Here's how it's done.
Have your track contain the built in Reaper EQ. Make the 4 band or highest frequency band a Low Pass:
On the main recording view you'll want to right click on the automation button and select the following:
Make sure you select Freq and not Gain.
Once this is done you'll have a blue bar show up under your track. Create points on the bar by holding Shift and left click where you want this effect start and again to end.
Now decrease the first point you made so that it's much lower than the second:
Now play it back and tell me that's not awesome.
You can hear how I used it on Jihad Ballad HERE
Thanks,
JFoBTQ

Thursday 5 July 2012

Writing Approach

The process of writing music can vary depending on your approach. For me, my initial song writing process starts with a guitar riff.
Some of my music started from riffs created in all sorts of places. Whether I was playing my axe on my bed, at my computer, out camping for a weekend, etc…if I come up with a catchy melody, or a heavy chord progression, I remember it and get to recording as soon as possible.
Also, often enough, I start recording a songs intro, and let it flow from there. Any one song can take anywhere from 1 week to a couple months to complete. Especially when writers block kicks in (damn you writers block).
Once I have my catchy riff, or a nice sounding intro, the flow and layers start from there. A lot of my music has many layers to it, meaning a base of 2-3 notes then a layer of heavier guitar tracks, a layer of strings or ambient sounds, drums, bass, all sorts of plug-ins (VST’s). It’s like baking a cake only with sound and emotion.
I’ll very often start a project/track, then scrap it all together. I usually keep a piece of it in my mind, then use it when the time comes on another track. If you listen to my songs, you’ll see that they are often a collection of riffs that I try to flow into one another. Sometimes this works well, sometimes it doesn’t.
When you create your songs, you’re approach can be very different, but as long as you like it, that’s all that matters. I put pressure on myself to make something better every time I release a song, but the truth is that I’m happy with the feedback I get from the youtube community, and I shouldn’t stress myself out worrying if something is good enough to release.
Enjoy yourself, and try new things. Keep playing with tones and sounds in your DAW until you find parts you like. There’s an unlimited amount of resources on the Internet for recording music to tap into, so use it. Tutorials, lessons, tabs, and all kinds of inspiration. Listen to your youtube peers and see what they are doing, listen to their approach to recording and song structure, gain inspiration from everywhere and put it to work.

Wednesday 28 December 2011

Hardware and Configuration

So in my first post I said I wouldn't go into how to connect and configure your hardware device in order to allow you to start recording your guitar/bass on your computer...well I've changed my mind so here goes nothing.

First of all, I purchased a Line 6 product called Toneport UX1. It's a very simple interface, which allows you to connect a guitar/bass and a microphone.


The set up is simple.

Guitar to Toneport
Toneport to PC (via USB)

It really is as easy as that. But don't get frustrated when we get into the next part.

Configuring your DAW (digital audio workstation) to allow your device to work within the software.

I seem to recall having a hard time getting things to work properly right out of the box so here's how it should work best for you.

Install your devices drivers on your computer and restart your machine.

To see instructions for DAW's other than Reaper please refer to this user manual:

http://l6c.scdn.line6.net/data/l/0a060072153e747a739e447303/application/pdf/GearBox%203.5%20and%20later%20Recording%20Setup%20Guide%20%28Rev%20A%29%20-%20English.pdf

Once you've restarted your machine, fire up Reaper. In Reaper, click on Options from the menu at the top, and select Preferences. From here you'll see a big navigation tree on the left hand column and a bunch of information on the right. To make sure your device is working properly, you want to go to the Audio section on the left hand side, and select Device.

In that menu, you have a drop down for the type of Audio Device you want to select/configure. Click on the drop down menu and select ASIO. From here you'll want to look right underneath that menu and see the ASIO Driver menu. Click on it, and select the option that has your devices name in it. My set up looks like this:


Use the same options as I have in my configuration and you should be running smoothly. For issues with delayed sound, or compatibility issues, please email me or leave a comment and I'll contact you to help.

Thanks for reading,

JFoBTQ

Thursday 15 December 2011

Step 4 - Drums

Installing drumming software is about as basic as installing any other software on your PC.

Whether you chose to use Superior Drummer, Addictive Drums, or BFD2, the set up process should be relatively similar. I happen to use Superior Drummer 2.3, so that's what I'll focus on.

S2.0 Features: http://www.toontrack.com/products.asp?item=30

An easy to follow installation guide can be found here: http://www.timespace.com/content_handler.php?name=sdfaq

Once you have Superior Drummer 2.0 installed. You'll want to make sure you've configured it to work within Reaper, or whichever DAW you decided to use.

First of all, make sure your VST is in the right folder so that your DAW can recognize it. Now load up your DAW and insert a new track. Click on FX, which should show up as a small green icon in the track. When the window pops up, click Add, VSTI, then look for Superior Drummer 2.x. Once you have it loaded, it should look something like this:


Pretty sweet looking, I know....

Try playing around with the different kits available in the version you downloaded. Remember that you can purchase additional kits that have the same sound style your looking for. My recordings on Youtube have several kits from a basic rock kit, Drum Kit From Hell, Metalheads, to Superior 2.0 avatar with a nice set up I downloaded for free online.

If you've made it this far, you're about to see how painful making a drum track can really be. Don't worry though, because the end result is always worth the headache.

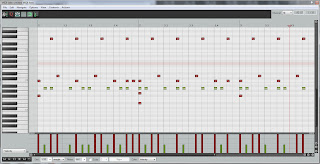
Select the track with your drum software, now hit insert in the menu at the top of the DAW, and select Midi Item. Each piece of the drum kit is recorded as a midi file, so you'll want to start plugging in your hits in the midi sequencer. Example:


Usually line C2 is the bass drum, start exploring above and below that line to hear what each line is going to trigger. From that, you should be able to get a sense of where to insert a hit/trigger in order to make it sound like a real drummer is plugging away on a real drum kit.

Check out some tracks on my channel and listen to the drums and how I've programmed them. It might give you an idea of how to create a basic drum track on one of your riffs.

http://www.youtube.com/user/JFoBTQ

Please subscribe, comment, and ask any questions if I've missed anything.

Thanks for reading,


JFoBTQ